
Disclosure: VPNFin is reader-supported. If you buy a VPN through links on this page, we may earn a commission at no extra cost to you. This never affects our ratings — here’s our full disclosure.
Most guides to a VPN on a Raspberry Pi still start with PiVPN. Its maintainer published a release in April 2024 titled “The end” and archived the project, then reversed course a week later: PiVPN now continues on a best-effort basis. It still works, but it is no longer the obvious default it was.
Meanwhile the Pi itself became a better VPN machine. WireGuard has been part of the Linux kernel since version 5.6, so current Raspberry Pi OS runs it without extra modules. NordVPN now lists Raspberry Pi OS among its supported systems too. This guide covers the three jobs a Pi can do with a VPN, and the right tool for each in 2026.
VPN on Raspberry Pi: The Short Answer
To reach your home network from outside, run a WireGuard server on the Pi, with PiVPN, wg-easy or a plain setup. If you cannot forward a port, a mesh service such as Tailscale avoids the need.
To send the Pi’s own traffic through a VPN, install your provider’s Linux app or load its WireGuard configuration. NordVPN’s app uses its WireGuard-based NordLynx by default.
Before you connect a headless Pi, add your SSH port and home subnet to the VPN’s exceptions. Otherwise the tunnel can cut you off from the very machine you are configuring. Our WireGuard and OpenVPN comparison explains why WireGuard suits a Pi.
Three Jobs a Pi Can Do With a VPN
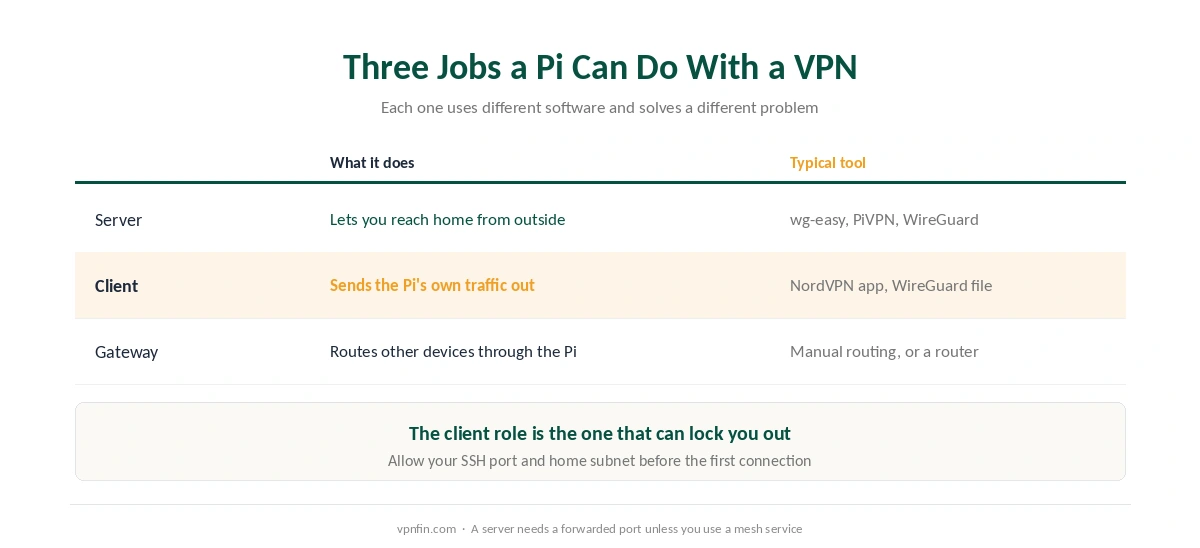
A server brings you in. The Pi accepts connections from your phone or laptop, so you can reach devices at home as if you were there. No commercial VPN is involved.
A client sends the Pi out. The Pi connects to a provider, and its own traffic, such as a torrent client or a scraper, appears to come from the provider’s server.
A gateway sends other devices out through the Pi. This is the most complex role, and a router can do the same job with less upkeep. Our router guide covers that alternative, and our Synology NAS guide covers the same server-or-client choice on a NAS.
Running a VPN Server: PiVPN, wg-easy or Plain WireGuard
PiVPN is still usable, with caveats. Its v4.6.0 release in April 2024 announced the end of the project. A week later, v4.6.1 explained that PiVPN would continue on a best-effort basis, with issues moderated more strictly and large new features unlikely. Existing installs keep updating through the system’s package manager.
wg-easy is the common replacement. When PiVPN announced its end, users of the popular Proxmox helper scripts discussed moving to wg-easy. It runs WireGuard with a web interface for adding devices, typically as a Docker container. Others simply configured WireGuard by hand.
Every one of these needs a forwarded port. Your router must pass the WireGuard port to the Pi, and a dynamic DNS name helps if your public address changes. If your provider uses carrier-grade NAT, forwarding may be impossible.
⚠️ That is where a mesh service fits. Tailscale, built on WireGuard, connects devices without any open port on your router. It is not a privacy VPN, because it does not hide your traffic from the websites you visit, but it solves remote access neatly.
Using a Commercial VPN on the Pi
NordVPN supports the Pi officially. Its support pages list Raspberry Pi OS alongside Debian, Ubuntu, Mint and Fedora for the Linux app. The app installs with a single script and connects with NordLynx by default. Our NordVPN review covers the service itself.
The sources disagree on 64-bit builds, though. A Raspberry Pi forum thread quotes an older NordVPN note saying arm64 was not supported. The current support page lists Raspberry Pi OS without that caveat, so on a 64-bit system, check that the package installs before you commit to it.
Other providers publish WireGuard configurations that load into the Pi’s built-in WireGuard tools. Proton VPN and Mullvad both do, as our Proton VPN review and our Mullvad review record. That route needs no provider app at all.
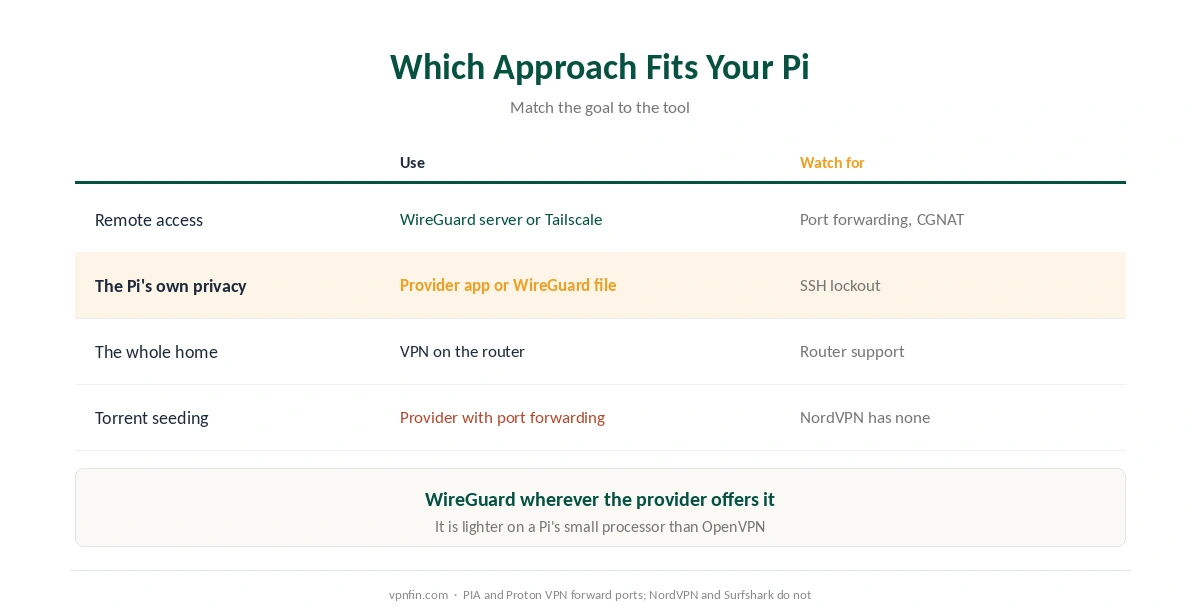
If the Pi seeds torrents, incoming connections need a provider that forwards a port. NordVPN does not. Private Internet Access and Proton VPN do, and our torrenting guide lists the rest.
Setting Up NordVPN on a Headless Pi
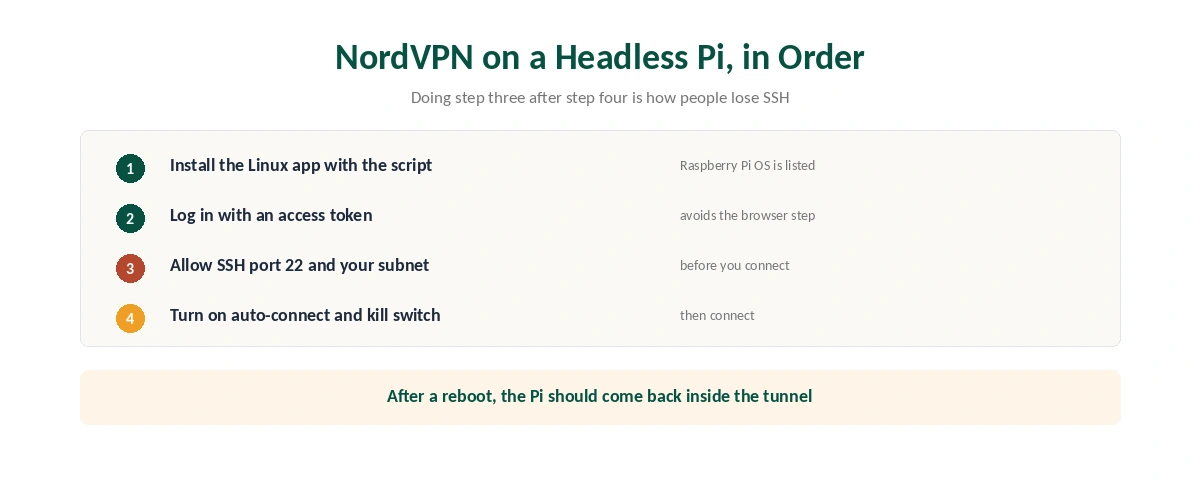
Order matters here, because the first connection can lock you out. Once the VPN is up, the Pi’s traffic goes through the tunnel, and a kill switch blocks the rest. If your SSH session is not excepted first, you lose it.
First, install the app and log in. On a Pi without a desktop, the browser-based login can fail, as one Raspberry Pi forum user found. Logging in with an access token from your Nord Account avoids the browser step.
Next, add your exceptions. A widely copied setup recipe adds SSH port 22 and the home subnet to the app’s list of exceptions, called the allowlist in current versions, before connecting.
Then turn on auto-connect and the kill switch, and connect. After a reboot, the Pi should come back up already inside the tunnel. Our kill switch guide explains what that switch does, and our guide to checking a VPN covers confirming the new address.
Why WireGuard Matters More on a Pi
A Raspberry Pi has a small processor by desktop standards, and encryption competes with everything else it runs. WireGuard lives in the kernel and uses a lean design, whereas OpenVPN runs in user space and does more work per packet.
On a laptop the difference may go unnoticed. On a Pi, especially an older or smaller model, it can decide whether the VPN keeps up with your connection. Our speed guide explains what else affects throughput.
Which Approach Fits Your Pi
For remote access, WireGuard through wg-easy, PiVPN or a manual setup, or Tailscale if you cannot forward a port.
If the aim is the Pi’s own privacy, use the provider’s Linux app or its WireGuard configuration, with the exceptions set before the first connection.
To protect the whole home, put the VPN on the router rather than the Pi, unless you enjoy maintaining a gateway. And for a fixed address you can reach from anywhere, our dedicated IP guide explains when paying for one helps.
How We Research
The PiVPN history comes from the project’s own release notes for v4.6.0 and v4.6.1 on GitHub, and the move to wg-easy from the archived discussion in the Proxmox helper-scripts project. NordVPN’s supported systems and NordLynx default come from its support pages, read on 25 September 2026, and the arm64 caveat from a Raspberry Pi forum thread. The lockout warning follows a published NordVPN setup recipe for single-board computers. Port-forwarding support comes from our own reviews. We did not set up a Raspberry Pi ourselves. Our full approach lives on the About Us page.
Raspberry Pi VPN FAQ
On a best-effort basis. Its v4.6.0 release in April 2024 announced the end of the project, but v4.6.1 a week later said it would continue with limited maintenance. It still works, though large new features are unlikely.
Yes. NordVPN lists Raspberry Pi OS among the systems its Linux app supports, and the app uses NordLynx by default. An older note on its site excluded arm64, so check the package installs on a 64-bit system.
The tunnel and kill switch blocked your local connection. Add SSH port 22 and your home subnet to the VPN’s exceptions before connecting, then turn on the kill switch.
WireGuard where you can. It is built into the Linux kernel and uses less processing per packet, which matters on a Pi’s small processor. OpenVPN still works when a provider offers nothing else.
Not with a standard WireGuard or OpenVPN server. A mesh service such as Tailscale connects your devices without an open port, although it does not hide your traffic from websites.
The Verdict
A Raspberry Pi makes a good VPN machine in 2026, as long as you pick the tool for the job. For remote access, use WireGuard, whether through wg-easy, a best-effort PiVPN or a manual setup. For the Pi’s own traffic, use a provider’s Linux app or WireGuard file.
On a headless Pi, set the exceptions before the first connection, then switch on the kill switch. And if the goal is protecting every device at home, put the VPN on the router instead.